
Hi guys today I am going to give very brief introduction about how create web server using python socket. There are several ways to do that. But here i will explain how cover basic functionalities of server using python socket.
The SimpleHTTPServer module has been merged into http.server in Python 3.
- First identify what is a server ?
A server is a computer program that provides services to other computer programs (and their users) in the same or other computers. ( The computer that a server program runs in is also frequently referred to as a server. )
If you want to know more about that use this links. : What is server , How server works
Now I think you have understood about how server do its job and why we need server. Then start developments.First,
- What is socket ?
A network socket is one endpoint in a communication flow between two programs running over a network.
Sockets are created and used with a set of programming requests or “function calls” sometimes called the sockets application programming interface (API). The most common sockets API is the Berkeley UNIX C interface for sockets. The Socket module provides the basic networking services with which UNIX programmers are most familiar. This module has everything you need to build socket servers and clients.
Further details.
| Class method | Description |
|---|---|
Socket |
Low-level networking interface (per the BSD API) |
socket.socket(family, type) |
Create and return a new socket object |
socket.getfqdn(name) |
Convert a string quad dotted IP address to a fully qualified domain name |
socket.gethostbyname(hostname) |
Resolve a hostname to a string quad dotted IP address |
socket.fromfd(fd, family, type) |
Create a socket object from an existing file descriptor |
| Instance method | Description |
|---|---|
sock.bind( (adrs, port) ) |
Bind the socket to the address and port |
sock.accept() |
Return a client socket (with peer address information) |
sock.listen(backlog) |
Place the socket into the listening state, able to send backlog outstanding connection requests |
sock.connect( (adrs, port) ) |
Connect the socket to the defined host and port |
sock.recv( buflen[, flags] ) |
Receive data from the socket, up to buflen bytes |
sock.recvfrom( buflen[, flags] ) |
Receive data from the socket, up to buflen bytes, returning also the remote host and port from which the data came |
sock.send( data[, flags] ) |
Send the data through the socket |
sock.sendto( data[, flags], addr ) |
Send the data through the socket |
sock.close() |
Close the socket |
sock.getsockopt( lvl, optname ) |
Get the value for the specified socket option |
sock.setsockopt( lvl,optname,val) |
Set the value for the specified socket option |
Here I listed class methods and instant methods of python socket module.
Let’s do some practice 🙂 .
import socket   # import socket module

HOST,PORT = '127.0.0.1',8082 # host -> socket.gethostname() use to set machine IP

my_socket = socket.socket(socket.AF_INET,socket.SOCK_STREAM)
my_socket.setsockopt(socket.SOL_SOCKET,socket.SO_REUSEADDR,1)
my_socket.bind((HOST,PORT))
my_socket.listen(1)
This is first few codes of my server. In first line we assign two values to HOST and PORT. If you don’t give any value to HOST socket module accept any host IPs currently running on our machine. If you want to give your machine name as host you can use,
HOST = socket.gethostname()
In the second line ,
my_socket = socket.socket(socket.AF_INET,socket.SOCK_STREAM)
we create new socket object and assign it as my_socket . ( Yeh ! its like variable, now you can call your socket using this name 🙂 ) If you need more details you can refer python documentation. First argument is about socket family.Python gives constraint values to address family. They are ,
- AF_INET – Members of AF_INET address family are IPv4 addresses.
- AF_INET6 – Members of AF_INET6 address family are IPv6 addresses.
- AF_UNIX – Members of AF_UNIX address family are names of Unix domain sockets.
Second argument is about socket type.Here i explain few socket types.
- SOCK_STREAM – Stream sockets, also known as connection-oriented sockets, which use Transmission Control Protocol (TCP), Stream Control Transmission Protocol (SCTP) or Datagram Congestion Control Protocol (DCCP).
- SOCK_DGRAM – Datagram sockets, also known as connectionless sockets, which use User Datagram Protocol (UDP).
- SOCK_RAW – Raw sockets (or Raw IP sockets), typically available in routers and other network equipment. Here the transport layer is bypassed, and the packet headers are made accessible to the application.
Next ,
my_socket.bind((HOST,PORT))
On here what we do is give host address and port to the socket we created. Finally now our socket object is created. But we must tell it to what to do next.
Yeh, before that take a very small example.Just think your friend come to your home to borrow book. But you not at the home. Now what you do …. simple your ask your mother to give that book to your friend when he or she come to home. Creating server is also like that. Simple you have to tell give that when someone request something. In our example your mother act like server. Your friend act like browser.
Now you have to ask your socket to listen to your friends ( actually browser requests ).
my_socket.listen(1)
Ok your socket ready to listen request. But your server should listen to all the request in every time. That means your socket should accept request again and again without stop. To do that we can use loop. Yes while loop…
while True:
    connection,address = my_socket.accept()
    req = connection.recv(1024).decode('utf-8')
    print(req) # Get print in our python console.
accept() , accept request and return two valuable information. First socket connection and client socket address. Here after we use this connection to send or serve what client requested. When we get request this connection contain about request details. To get this data we can use
connection.recv(1024)
recv() return the request details and we said get maximum 1024 bytes from connection request. But its look like this,

wait.. i this its like mess. Should i give some beauty. Wait i decode using UTF-8. Now we have this out put,
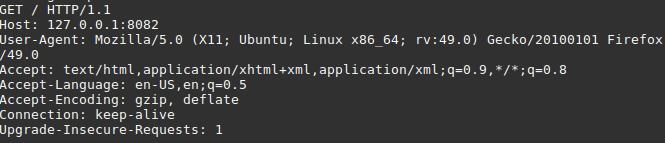
yeh. It look nice. In the first line it contains most important information. First request method ( Here “GET”) . Then what request (Here ” / “) then HTTP version ( Here ” HTTP/1.1″)
Wow , now we know what client request and how request. Then now we have to send what they request. As single step now i show you how send string to each request.
while True:
   connection,address = my_socket.accept()
   connection.send('Hello world!'.encode('utf-8'))

   connection.close() # close connection
using send() / sendall() methods we can send a response to the client. But don’t forget this connection transmit data like byte. Therefore we must convert our string to UTF-8 format. to do that we use encode(‘utf-8’) [This encode will works on python 3 version, If you use another version please refer the documentation given]
Finally we should close the connection.Because we use connection per request.
Wow.. now you know how to build simple server which response with a string set by you. Run your code and goto browser and type host IP and port you set in the search bar.
http://127.0.0.1:8082
Congratulation… you will see your message in your browser..
Wait, you can do more than that… You have to send html file and also css , js and image files too.
Now you know basic functionality. I will describe further improvements for this server in my next blog post.
stay tune …. 😉
[ Some of this codes may change due to its python version ]

Great work….
LikeLiked by 2 people
Thank you machn…
LikeLiked by 1 person
Woow NIce one
LikeLiked by 2 people
Thanks bro
LikeLiked by 1 person
keep up the good work Emalsha (y)
LikeLike
Good work! very informative.
LikeLiked by 2 people
Thank you..
LikeLiked by 1 person
Nice! Thanks for sharing 😉
LikeLiked by 2 people
welcome …
LikeLiked by 1 person